Creating Player Shops
-
EMC has a custom shop sign feature for use on Residences. There are three different versions of a shop sign that are reflected in how they are made and used. However, all of them use the same format.
To learn how to buy and sell from various shop signs, visit the Wiki page about using player shop signs.
Contents
- How shop signs work
- Setting up a buying shop sign
- Setting up a selling shop sign
- Editing a previously-created sign
- Setting up a shop sign with custom text
- The old method
- CHOOSE shop signs
- Setting up a CHOOSE sign
- Setting a range of slots for the shop to use
- Setting a singleslot for the shop to use
- Removing shop signs
How shop signs work(top)
In order to set up a shop, you must first start by placing a chest, trapped chest, shulker box or barrel somewhere. This chest should contain the item(s) you would like to sell (or it will store any items you may be buying). Then, you need to place a sign near the chest - the shop sign. A shop sign can be placed above, directly on top, attached to, or beside the chest.
The Remote Shop Sign allows you to have a shop sign far away from the chest that contains the items being bought/sold.
There are three different types of shop signs: the hash (#) sign, the CHOOSE sign, and the old shop sign. The old method is basically kept in place to keep things easy on the players, but it is recommended that you use the current system with the hash (#) sign.
Setting up a buying shop sign(top)
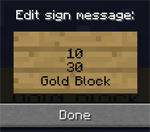
You can now set up signs without specifying an item. To create a sign like this, see the text below:
- Line 1: Empty (leave this line blank; your username will appear automatically)
- Line 2: The amount of items you want to sell (For example, 3)
- Line 3: The cost of the item you are selling in Rupees (For example, 100)
- Line 4: #

Once you click "Done," you should get a confirmation message in the Chat that says "Shop partially created! You must now set the item to sell by left clicking the sign with the item in your MAIN hand.," and your sign should look like this, but with your username instead:

To finish setting up the shop, grab the item you want to sell in your main hand and left click the sign. It should automatically update to show which item the shop is selling, and give you a message in the Chat that says "Shop successfully created for <item>."
Setting up a selling shop sign(top)
You can also set up a shop to buy items rather than sell them. The process is very similar to the one shown above, but the only difference is in the third line of the sign:
- Line 1: Empty
- Blank (your username will automatically appear here)
- Line 2: The amount of items you want to buy
- For example: 5
- Line 3: How much you want to pay for the item, prefixed by a colon
- For example: :40
- Line 4: #
- Line 1: Empty (your username will automatically appear here)
- Line 2: The amount of items you want to sell or buy
- For example: 2
- Line 3: Both prices separated by a colon
- For example: 100:40)
- Line 4: #
Editing a previously-created sign(top)
The new shop system introduces a new command known as /createshopmode,which allows you to edit the item you are selling without having to destroy the sign.
Once you type the command you should get this message in the Chat:

Left-clicking any shop sign you created with an item will change that sign to sell the item in your main hand.
Setting up a shop sign with custom text(top)
You can also make a shop sign with custom text (including formatting) on the fourth line:
- Line 1: Empty
- Blank; it will auto-fill with your username later
- Line 2: The amount of items you want to sell or buy
- Line 3: The price of the item
- Line 4: #[The custom text here]
- Brackets are not included

Follow the same steps from the regular shop signs - left click the sign with the item you want to sell. This time, instead of displaying the item name, it will display the custom text you wrote on the last line.

When players left click your shop sign, they will get a confirmation message before the purchase is complete:

After this confirmation message is shown, you need to click the sign again to confirm your purchase.
The old method(top)
The old method of creating shops is similar the process shown above. However, it is less advanced in that instead of using # on the fourth line, you simply write the item's name or the item's ID. To find this out, type /iteminfo while holding the item you want to sell.
When it is written, it may look like this:
Shops created under the old method can still be altered (in what they sell or buy) with the /createshopmode command.
CHOOSE shop signs(top)
With the 2016 Independence Day Update (found here), a new shop sign was introduced to replace the now obsolete SLOT signs.
CHOOSE signs should be used when you are selling items that have unique or varying properties, and cannot be sold as the same item, such as Promotional Items and horse eggs with different stats and enchantments. Their other main advantage is that players get to see the items in the chest through a dialogue box/user interface and can click to choose what to buy.
You cannot sell items to CHOOSE signs with the :sell mechanism (use the #sign system instead).
Setting up a CHOOSE sign(top)
A default CHOOSE sign will allow players to buy any item in any slot of the chest. When it is linked to a chest (rather than a range of slots, as explained below), the dialog/user interface box will show all of the available rows. You can make a default CHOOSE sign like this:
- Line 1: Empty
- Blank; it will auto-fill with your username later
- Line 2: The amount of items you want to sell
- Example: 64 for a stack
- Line 3: The cost of the item you are selling
- Example: 100r
- Line 4: choose
 A choose sign where players can buy 3 items at once.
Note: On the amount line, you can only set the sign to sell multiple copies of the same item (i.e. the same item ID, which can be found with /iteminfo).
To ensure it works, you can test the chest dialog yourself by left clicking on your CHOOSE sign. Note that you can only use the dialogue box, and no transaction will occur if you are the owner of the shop.
After players click on an item to buy, a confirmation dialog is shown. Once players click the sign again, the actual purchase is made.
The CHOOSE sign dialog is the same as that of a customized shop sign.
Setting a range of slots for the shop to use(top)
You can limit the range of slots that a CHOOSE sign draws its stock from. The slots in a single chest are numbered as follows:

The first 3 lines of the CHOOSE sign remain the same, but on the fourth line, you would specify the range or the specific slot you want to for the shop's stock to draw from.
So, for example, if you want to set up a CHOOSE sign that will only sell the first 4 items in a chest (so slots 1 to 4), you could type something like this:
- Line 4: choose 1-4
Note that a CHOOSE sign will first pick an item other than the clicked slot before using the one in the slot itself, even if that other item falls outside the specified range. This behavior is comparable to the old SLOT signs.
Also, note that the items being sold by CHOOSE signs can be changed to the held item when clicked with/createshopmode activated, just like all the other shop signs.
Setting a singleslot for the shop to use(top)
You can do this by specifying one slot instead of the default entire chest or range shown above, like this:
- Line 4: choose 4
Removing shop signs(top)
Shop signs cannot be removed by simply breaking them. This is because the sign will think you are attempting to buy from it, or it will think you are clicking on them while using the /createshopmode command to update the sign. Therefore, the best way to remove a shop sign is to hold shift and break the sign.

